Over time you’ve noticed that your toilet is not flushing as forcefully as it used to, resulting in a partial flush leaving unwanted waste staring back at you!
So, what could be the cause?
First, and the simplest thing to do is check the water levels in the cistern. Usually, there is a ‘fill line’ on the inside of the cistern indicating the recommended water level. The low water level is the most common factor causing a partial flush or blockages, there just isn’t enough water to flush away the waste.
There is a fine balance here between excessive water usage and conservation, versus a clean flush. Start by gently increasing the water flow (from the inlet valve) until a clean flush is achieved. It could be way below the ‘fill line’ saving water (or not).
When the correct water level has been set but the flushing problem remains further investigation is needed.
Your WC has two parts – the cistern and the bowl. The bowl is static so is the cistern but inside the cistern, there are a few moving parts. The flush is activated either by a lever or button. Both wear/break over time and cause flushing problems. The following could be the reason
- Your tank having a low water level (we’ve fixed that).
- Worn linkage connections
- Faulty or loose connections
- The handle/push-button linkage broken
- Something broken
- Siphon stuck/broken
- Limescale build-up
1. Is the flush linkage sound?
When you press the flush button or push the handle, it raises the flush mechanism via a connecting link dropping the water down to the toilet bowl and flushing the waste away. If the linkage has stretched/broken or come lose it will reduce the effectiveness of the flush.
2. Faulty components
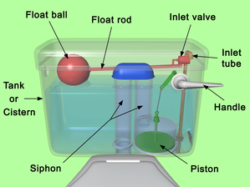
First what type of toilet do you have. It could be a button-operated siphon or a traditional one. Siphons have a diaphragm at their center while the traditional one has a float ball (to regulate the depth and amount of water in the cistern) a flush handle which when pushed raises the piston emptying the cistern (see diagram below).
Remove the cistern cover to see if there any obvious signs causing the problem. If you are a keen DIY person and confident you could tackle it yourself give it a go, if not, then call serviceteam Ltd for a professional plumber to visit and investigate?
Let’s fix it!
Initially, get the requisite gear for the procedure. This will typically include a screwdriver with a flat head, a bucket and sponge, and a replacement diaphragm or flushing mechanism (depending on the internal workings).
If it is a complete flushing mechanism/valve, we recommend you take it down the nearest plumbing merchants for an exact like for like replacement (once removed)
- Remove the lid of the toilet head.
- Shut down the water inlet supply from the isolation valve. This is usually located a distance down or mid way down the inlet pipe to
- the cistern. Depending on the type of isolation valve you may need a flat head screwdriver to turn it off, others can be turned off by hand.
- Flush the cistern, and soak up all excess water with a sponge until completely dry.
- Remove the flushing mechanism. Also disengage the trip lever from the link to the handle.
- Bring in the replacement.
- Put this new one in place and reconnect the links and hooks. Secure in position.
- Turn on the isolation valve.
- Replace the cistern lid and test the flush.
3. Broken Handle
Easy to replace. The handle is held in place by a threaded nylon pipe and nut assembly. The end of the handle inside the cistern is linked to the lever that raises the piston and flushes the toilet.
Remove the nylon nut and uncouple the lever linkage, connected to the flush piston. Fit the new handle and reconnect.
If the handle is just loose, tighten the nylon nut that holds the handle in place with a pair of grippers or an appropriately sized spanner.
Another possible problem could be the build-up of limescale.
A decent descaling agent like Viakal Anti Limescale spray (this is just one of many descalers on the market). Spray liberally, leave for a period of time, as per manufacturer’s instructions, and then give it a decent scrub using a ‘grout’ brush or hard bristle ‘dish’ brush, rinse off and flush.
Conclusion?
Even though these tasks can be relatively easy for a DIY person they can, at times be problematic? If you ever get in a jam call serviceteam Ltd and arrange a convenient day and time for a professional plumber to visit.
